

Missed the rest of the series? Read them here: Starting your own Herb Garden: Part 1: The Benefits of Fresh Herbs, here: Starting your own Herb Garden Part 2: Planning and Layout, here: Starting your own Herb Garden Part 3: Seed Starting and Growing from Cuttings, and here: Starting your own Herb Garden Part 4: The Indoor/Potted Herb Garden.
Did you know that some of the most widely used and most delicious herbs are the easiest to grow? In this last of installment of the Starting Your Own Herb Garden series, we'll show you how to grow your own garlic, ginger, and cilantro.
Ginger
Ginger has loads of health benefits (just do a Google search and you'll come up with tons), so much so that many people take daily ginger in capsule form. I prefer it fresh or pickled, sushi style. Fresh grated ginger is fantastically useful for cooking, especially in Asian dishes, and it makes a lovely tea. It's also ridiculously easy to grow your own.
 Note: This is ornamental ginger (comes it pink or red flowers). It's pretty but not edible. The edible kind is not pretty, doesn't flower at all, and is much smaller.
To grow your own, visit your local farmers' market after the last frost. I got mine from the local grocery and it grew fine, but I was lucky--much of the commercially grown ginger is treated so that it won't reproduce. Select a rhizome (this is what most people refer to as the ginger "root," but that's actually incorrect) at least 3 inches long and with at least two well-developed growth buds--little protrusions at the tip of a "finger" of the rhizome, kind of like eyes on a potato. The more growth buds your rhizome has, the better. If the tips of the "fingers" are greenish, even better.
 A ginger rhizome with 7 fingers and many growth buds. This could produce up to 10 ginger plants.
Planting Ginger
If you're unsure whether your ginger rhizome has been treated with an growth retardant, soak it in a glass of water overnight before you plant it. What's cool about ginger is that if your rhizome has more than one "finger," you can cut them apart and plant each one separately to produce several ginger plants. The only rule is that each section you plant should be at least 2 inches long and have at least one growth bud.
Growing Ginger
You can grow your ginger in a pot with potting soil, like mine, or if you live in an area that never frosts, you can plant it directly in the ground, as long as the soil is well-drained and not too clayey. Ginger takes 8 to 10 months to mature and hates the cold, which is why you should opt for potting unless you live in an almost year-round warm climate. Plant your rhizome sections 6 to 8 inches apart and 1/2 inch deep, growth buds facing up. Water regularly, but don't soak them. Ginger hates having wet feet. After a few weeks (sometimes several), you'll see the first growth. It'll look like a thin green spike.
 Ginger plant spike with first leaf
  6 months later
Harvesting Ginger
Ginger is ready to harvest when the leaves turn yellow and begin to wilt, 8 to 10 months after planting. I recommend harvesting in the morning so the rhizomes have ample time to dry in the sun. To harvest, loosen the soil with a garden fork and lift the whole thing gently out of the ground. Brush as much of the dirt off the remaining rhizomes as you can and lay them in the sun for the rest of the day. At this point you can cut off a few sections of the rhizome with good growth nubs to replant for next year. Break up the rest and cut off any remaining stems.
Storing Ginger
There are three options I know of for quality long-term storage of ginger:
1. Keep unpeeled in a ziplock bag in your refrigerator's crisper (up to 2 months).
2. Scrape off the skin with the edge of a spoon, cut into 1-inch chunks, and store covered in vodka or rice wine (up to 1 year). The ginger won't lose its flavor, and you can use the leftover liquid in stir-fry dishes, salad dressings, or sauces. I've yet to make a ginger vodka martini, but I'd love to try it.
3. Pickle it by peeling as above, cutting into 1-inch chunks, and storing covered in rice vinegar for 3 weeks. Remove from liquid. Use the remaining liquid as above, and store the pickled ginger in the refrigerator up to 1 year.
Cilantro
Ordinary cilantro is also easy to grow and not too picky about its soil, as long as it's fairly loose and not too wet. It prefers shade or filtered sun, will grow in pots or right in the ground, and grows quickly. Five cilantro seeds will yield you quite a bit of cilantro in a month or two. Plant the seeds 4 to 6 inches apart and 1/2 inch deep. If planting outdoors, wait until it's relatively warm out to plant your seeds. They don't like the cold.
 Cilantro, one week after planting seeds. If you want instant herb gratification, this is your plant.
Garlic
Garlic is another quick sprouter, though it takes longer to mature than cilantro.
Planting Garlic
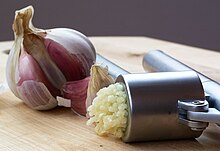
Unless you're in a year-round warm climate, the best time to plant garlic is in mid-autumn. Buy a head from your local grocery or farmers' market and keep it in the fridge until you start to see little roots sticking out the bottom. Then separate the cloves and plant them in a sunny spot, root side down, 6 inches apart, and 2 inches deep. No need to peel off the skin. The soil should be loose and well-drained.
Growing Garlic
After a few days you'll see the shoot coming up. These will die down once it gets cold. When that happens, mulch well over the whole bed. Your job is done until spring. In the spring, remove the mulch. More shoots will appear and these will continue growing into leaves that look like onion leaves but flimsier. About a month before the garlic is ready to be harvested, they'll send up something called a scape. The scape looks like a thick, hard green onion, and it's edible. It tastes just like garlic but milder and you can cut it off to eat once it's about 4 inches long. If you let them keep growing, they'll get very tall and start curling like something out of a Tim Burton movie. Once they start to curl, they'll get tough and begin losing their flavor.
 Garlic, two days after planting
 Garlic, 1 week after planting
Harvesting Garlic
You'll know when your garlic is ready to harvest because its leaves will start to turn brown and wilt. As with the ginger, loosen the soil and carefully pull the whole thing up. Brush off the dirt and hang the whole thing in a cool, dry place for 2 to 3 weeks. They should be dry and not smell very strongly at this point. Cut off the foliage and peel off the outer layers of skin until it looks like something you'd see at the grocery store.
Storing Garlic
Do not seal your garlic bulbs in bags or airtight containers; this promotes molding and rotting. Garlic will keep in the fridge for 2 to 4 weeks, but the moisture level there is too high for it to keep long term. Garlic keeps longest in a cool, dry place, like in a terracotta jar or in the basement.
Growth update!
The habaneros still haven't germinated. I planted five seeds, 3 three weeks ago and 2 two weeks ago. Nada. I've heard they take as long as 2 months to germinate, so I'm not giving up yet. I'm keeping them in direct sun as much as possible to maximize warmth. Somebody I know said his didn't germinate until he started setting them on top of the clothes dryer every time he ran it.
The watermelon seedlings are growing, but not rapidly. We now have nine of them. No sign of the forget-me-nots germinating yet, but it's only been one week.
The basil and mint that I transplanted last week from the cuttings are flourishing, so I'm excited about that. I'm already dreaming of caprese salads.
 Mint cutting transplant
 Basil cutting transplants


0 comments:
Post a Comment