Monday, May 10, 2010

Decorating/Gardening on the Cheap: Pineapple Top into Interesting Houseplant


Looking for something to spice up your office or home interior? Add a little green (and sometimes pink) to your environment with a new, free houseplant. Pineapples make great houseplants; they don't attract bugs, they don't require much care, and they're incredibly easy to grow. Have a cat that chews on every plant or flower you bring into the house? No worries, the pointy, thick leaves of a pineapple plant won't interest them. And, if you treat your pineapple plant well, you may even be rewarded with a cute little (edible) baby pineapple.

Here how you do it:

Next time you buy a pineapple at your local grocery or farmer's market, make sure it has a nice green top. The leaves shouldn't pull out easily, and the bottom of the pineapple should smell strong and sweet. If your pineapple is still a bit green, no problem, just perch it upside down (to help it ripen evenly) in a windowsill when you get home and wait a few days for it to turn yellow. If it's just a tiny bit green, it's probably just fine to eat. An overripe pineapple is not a pretty, or tasty, thing.

When you're ready to eat it, use a towel or garden glove to grab the whole green top and twist is gently off. Don't pull, just twist. If you're lucky, your pineapple top will already have some rootage going on, like in the photo below, or at least a row or two of root nubs.


Then, cut off the little bit of fruit left on the stump with a knife and, starting with the lowest set of leaves (usually brown and dried), rip off the several bottommost rows of leaves until your pineapple plant will sit nicely in a jar of water with the stump immersed. Set your new plant and its jar in a window (it doesn't have to be very sunny) and wait. In a week or two, your new little friend should have enough roots to plant in a pot, or even directly in the ground.

Pineapple #1 after a few days in water on the windowsill.
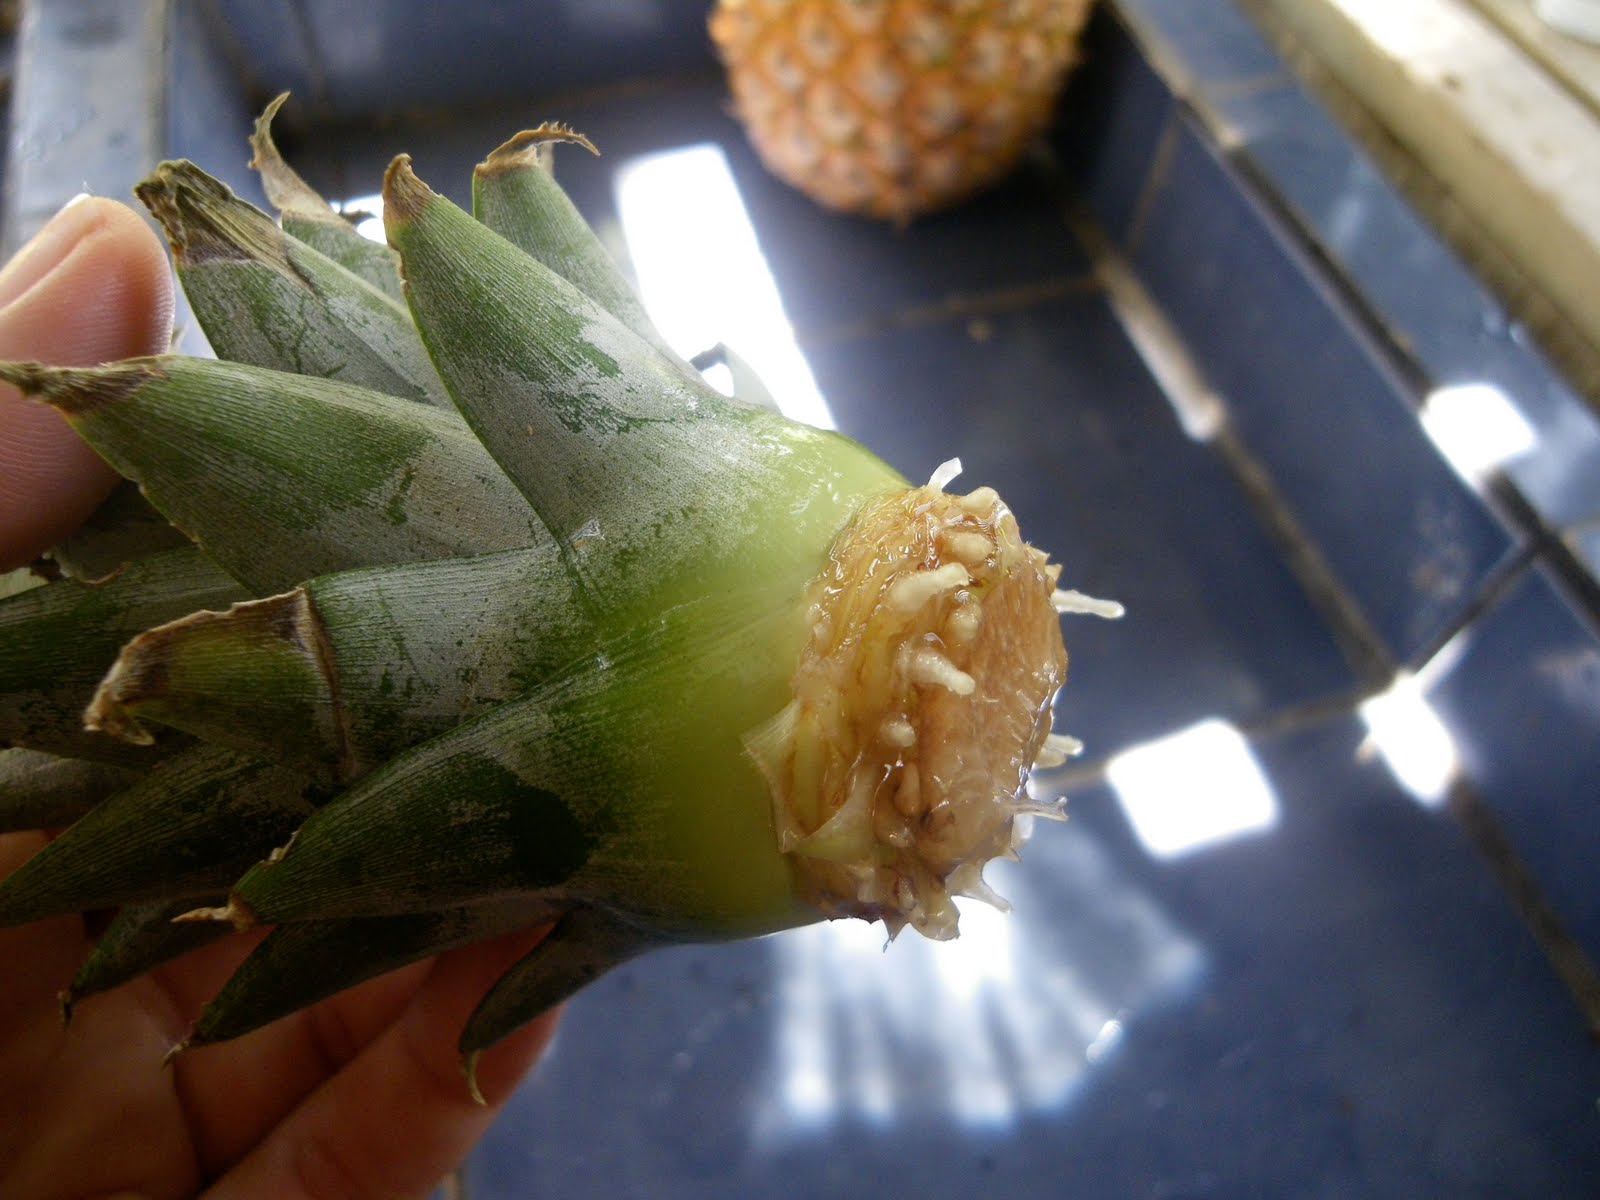
Pineapple #2 after a few days in water on the windowsill.

If you live in a tropical or near-tropical locale, and you can plant your pineapple in the ground rather than in a pot—just be aware that these plants get extremely large when allowed to do so, and will take up a lot of space in your yard. They do, however, take kindly to being trimmed, but in my opinion they don't look as nice that way.

We eat a lot of fresh pineapple around here.

Once your little friend has established an inch or so of roots all around, he's ready to be planted. You can use potting soil, but mine did fine in just regular dirt. You can start with a little 6" pot, like I have and repot as it grows, or you can put it directly in a larger pot (20" or so ought to do it) so you won't have to move it.

Newly potted pineapple (along with newly potted orange and lime trees).

Pineapple plants like full sun to partial shade, warm weather, and moderate watering. Keep the soil moist, but don't overwater. If you live in an area that gets cool, bring your potted pineapple inside when it starts to get cold, way before any danger of frost. Pineapples are hardy, but they are tropical plants.

First pineapple in the ground, just planted.

First pineapple (front) still doing well, now accompanied by four others (along with some rosemary and wild chayote).


I now have one pineapple plant in a little pot and six lining the fence in my backyard. I have to choose wisely what I plant along this fence because there are often cows grazing on the other side of it. I'm fairly confident they won't want to chomp on sharp, slightly serrated pineapple leaves, and tiny, needle-like rosemary leaves, but the chayote I'm not sure about. But it just popped up there, so there's no point in pulling it out.

Pineapple plants take at least a year, usually two, to bear fruit, so be patient. In the meantime, your living space will benefit from your pretty new houseplant and some extra, freshly created oxygen.


Decorating/Gardening on the Cheap: Pineapple Top into Interesting HouseplantSocialTwist Tell-a-Friend

Monday, March 8, 2010

Carnival of Money Stories 2: Disaster Issue


Welcome to the March 8, 2010 edition of carnival of money stories 2. I've decided to go with the disaster theme based on the content of some of the posts submitted, most insignificantly but amusingly, Jim's (at Blueprint for Financial Prosperity) which revolves somewhat around the apparently impending zombie invasion.

Enjoy!

Editor's Choice

Usually picking the editor's choice articles is challenging, but this week one article stood out so much (inspiring, refreshing, and well-written) that I have no choice but to give it the number one spot. I don't know where Baker found her, but I'm glad he did. You should take a look at her own blog/site while you're at it:

Baker presents a guest blog by Carmen 8 Effective Ways to Raise Frugal Kids posted at Man Vs. Debt, saying, "Follow these 8 simple, but effective tips to buck the consumerist trend and raise frugal kids!"

However, the prize for most humorous comments goes to.... jim at Blueprint for Financial Prosperity for his post Best Places to Hide Money At Home.


And I'd like to highlight CreditCardAssist's post on How to Donate to Relief Organizations simply because the world could use more good samaritans.


Business

Ryan @ Cash Money Life presents How to Organize Small Business Finances posted at Cash Money Life, saying, "Tips on how to organize your small business finances, including how to separate your personal and business income, use business checking and savings, accounting software, and more. Essential reading for small business owners and freelancers!"

FMF presents Office Depot's Strange Way of Applying Coupons posted at Free Money Finance, saying, "My unusual experience with Office Depot."

BWL presents 3 Mistakes to Avoid if You're Self-Employed posted at Christian Personal Finance, saying, "Whether you’ve decided to turn your blog into a business, sell a multi-level marketing product or rent a storefront to start selling your homemade jewelry there are some mistakes you will definitely want to avoid…"


Investing

Adam presents Don't Act your Age: How to Keep Saving and Keep your Friends posted at Magical Penny, saying, "Some people begin investing because they think they should, but they haven't fully worked out the right amount to invest. They could easily get discouraged by friends or by other needs if they haven't budgeted correctly. This article is full of points to help maintain your resolve; to not act like most other young people; to show respect to your pennies in the present for a better future tomorrow (and so you don’t have to rely on the lottery in your old-er age)."

Silicon Valley Blogger presents Best Ways To Invest Small Amounts of Money posted at The Digerati Life, saying, "Some of my personal stories and examples of how I've been able to make my money grow with only small outlays towards various investments."

The Dough Roller presents How to Open a Scottrade Brokerage Account Online posted at The Dough Roller.


Other

Money Beagle presents I Love When The Free Money Fairy Stops By posted at Money Beagle.

Craig Ford presents How to Afford to be a Stay at Home Wife or Mom posted at Money Help For Christians, saying, "Outlines a step by step plan for couples who want to live off one income."

Jeff Rose presents What Happens When a Life Insurance Policy Lapses posted at Jeff Rose.

me in millions presents Moneytalk Class #3: Planning for Future Life Events posted at me in millions, saying, "As a twenty something, I never really gave much thought to end of life issues. I just took a class and this is what I learned."

2 Cents presents Financial Literacy Is Like Green Eggs and Ham posted at Balance Junkie, saying, "This article looks at some good reasons to become more financially literate and encourages us, like Sam I Am, to try it!"

Sun presents TurboTax 2010 Has Some Nice New Features posted at The Sun’s Financial Diary.

The Smarter Wallet presents The Truth About Bank Fees: What Your Bank May Be Hiding posted at The Smarter Wallet, saying, "On banking matters."


Shopping

For the ocularly challenged among us, Tom @ Canadian Finance Blog presents How I Got $8 Glasses posted at The Canadian Finance Blog, saying, "Alan lets us know how he was able to get new glasses for only $8!"


And just because I can:


I'd take zombies over that any day. Aaaaand that concludes this edition. Hope you enjoyed it. Submit your blog article to the next edition of Carnival of Money Stories 2 using our carnival submission form. Past posts and future hosts can be found on our blog carnival index page.


Carnival of Money Stories 2: Disaster IssueSocialTwist Tell-a-Friend

Wednesday, January 6, 2010

Pet Food: Save Money (and your pet's health) by Preparing Your Own


For years our cats were accustomed to eating the rather expensive Nutro brand dry cat food. But after moving to a small town, we found it quite difficult to find dry food for our cats, period, let alone good food that doesn't contain animal meal, by-products, or tons of corn and other grain fillers that cats don't need in their diets.

Turns out the unavailability of cat food here has been a blessing in disguise.

First we gradually switched them from their regular dry food to canned tuna, but after some research found that an all-tuna diet, especially canned tuna prepared for human consumption, can be unhealthy for cats over time.1 Since the dry food we have access to isn't good for them and feeding them tuna all the time isn't either, we were back to the drawing board. After some more research we decided to switch our cats to a raw diet—well, partly raw. We now feed them either small chunks of raw chicken or boiled fish (boiled because still more research showed that raw fish may be unhealthy for cats2. The jury seems to be out on that claim, however, as many raw feeding advocates seem to think raw fish is just fine.3

The new diet has been a great decision for us and for the cats. They've been on their new diet for about three months now, and they're clearly thriving. Their coats are shinier, they have tons of energy, and Esmie's little dandruff problem has completely cleared up, all on its own. We now save on the exorbitant price of high-end (read: barely decent) cat food—our old dry cat food of choice costs around $14 for a 4-pound bag and contains a large amount of unnecessary grain filler.4 Best of all, the cats love their new meals so much more.

What We Buy, How We Buy
Our local fishmonger sells fish scraps for about $1.50 a kilo (68 cents a pound). Try asking for leftovers or scraps from your fish retailer or at the seafood section in your supermarket. They may not be as cheap as they are here in Costa Rica, but they'll be much cheaper than, for instance, fillets. Be aware, however, that very large fish such as tuna, salmon, tilefish, and king mackerel may contain high levels of mercury and other dangerous toxins since they are at the top of the fishy food chain.

Chicken gizzards and "cuts" also run cheap. Here, the gizzards (or "extras": liver, heart, and other organs) also go for about $1.5o a kilo (68 cents a pound), while the "cuts" (pieces of wings, legs, and thighs) are about $3 a kilo ($1.36 a pound). You should be able to find these for cheap at any butcher shop.

Preparation
Our cats seem to prefer the chicken livers and hearts, but it's often worth it to me spend the extra $1.50 to avoid juggling those slippery organs. As for preparation, I cut off all the meat from the bones, separate the pile of meat into small meal-sized piles, and then package and freeze the meals individually. Upon butchering, I discard the bones or give the cats a large bone each as a snack (and as a reward for controlling themselves while I handle all that delicious raw meat in front of them). Each day we thaw a meal for breakfast and one for dinner. We never freeze or cook the bones; we've learned these can both cause them to splinter easily, which could create a choking hazard.5

Savings
For our cats, each kilo of chicken or fish meat yields roughly 10 meals, about 1/2 cup per meal. So if we feed the cats fish or chicken gizzards, we spend about 15 cents per meal, and if we feed them chicken cuts, we spend about 30 cents per meal. We rotate the three types of meat on a fairly regular basis, so the average price per meal is about 20 cents.

Compare that to the cost of our old Nutro brand kibble—about 60 cents per meal, according to their suggested serving size—and we're saving quite a bit of money: 40 (depending on the type of meat) per meal, which comes out to nearly $25 a month per cat. I don't know about you, but saving $50 a month with little hassle and added health benefits for them sounds pretty cool to me.


Questions or thoughts about feeding raw or savings money on pet food? Leave us a comment!


Notes
  1. According to PetEducation.com, a website of veterinarians Drs. Foster and Smith, "large amounts [of canned tuna formulated for human consumption] can cause malnutrition, since it lacks proper levels of vitamins and minerals." http://www.peteducation.com/article.cfm?c=1&aid=1029
    An article on Australia's CatWorld.com also cites human-grade canned tuna as a cause of yellow fat disease or steatitis. http://www.cat-world.com.au/steatitis-yellow-fat-disease-in-cats
  2. The same article from PetEducation.com lists raw fish as dangerous for cats because it "can result in a thiamine (a B vitamin) deficiency leading to loss of appetite, seizures, and in severe cases, death. More common if raw fish is fed regularly." See also the article "Eight strikes against fishy feeding" at the Cat Nutrition Blog.
  3. See for instance RawFedCats.org's "Practical Guide." ProVet.co.uk also considers fish to be "a good raw ingredient to incorporate into cat foods," but concedes that it "has certain draw backs."
  4. Nutro Natural Choice Complete Care Ingredient List
  5. See http://www.rawmeatybones.com/faq.php#CookedBones and http://www.rawfed.com/myths/bones.html

Additional References and Resources
  1. Excerpt from "Food Pets Die For: Shocking Facts About Pet Food." Ann N. Martin. NewSage Press (1997). Website of Jeff Feinman, VMD.
  2. "The true horrors of pet food revealed: Prepare to be shocked by what goes into dog food and cat food." Jessica Smith. NaturalNews.com
  3. "What's Really for Dinner? The Truth About Commercial Pet Food" Tina Perry, Animal Protection Institute. Reprinted from The Animals' Agenda Nov/Dec 1996.
  4. "What’s Really in Pet Food" Born Free USA united with Animal Protection Institute. May 2007. An incredibly informative, thorough, and well-cited article.
  5. "Pet Food Regulation" Jean Hofve, DVM. The Whole Dog Journal and Little Big Cat.
  6. RawFedCats.org
  7. RawFedDogs.net
  8. RawLearning.com
  9. Yahoo Raw Feeding Group
  10. Yahoo Raw Fed Cat Group


Pet Food: Save Money (and your pet's health) by Preparing Your OwnSocialTwist Tell-a-Friend

Monday, December 28, 2009

No-Bake Cookie Twofer: Oatmeal Dark Chocolate Cookies and Coconut Bon-Bons


Plateful of Christmas CookiesImage via Wikipedia

I hate to cook, but I quite like to bake. This really doesn't work out well for me because we don't have an oven here in Costa Rica. What's a girl to do for delicious baked goods during the holidays without an oven? Buy them at the local bakery? Nope. The bakeries here don't make anything good (in my opinion) besides doughnuts and whole cakes; everything else is dry and brittle, full of hydrogenated oils (trans fats), and/or tasteless. Costa Ricans also seem to be generally confused about chocolate; for some reason they think it's supposed to be made with shortening and have no taste of cocoa whatsoever. The result is much like the oily and rubber-like "icing" top on a Hostess cupcake. No thank you.

My solution to the no-oven dilemma? No-bake cookies! That's right, cookies made entirely on the stovetop. Quick, easy, delicious.

These first cookies, I'll admit, don't look that great, but they *do* taste good. A variation that I tried with half the batch is to roll them into balls instead of just plopping them onto the wax paper. Let them chill in the fridge an hour or two and then roll them in powdered sugar, so they end up looking like doughnut holes. The result is a much prettier, still tasty cookie that looks nice when paired with the bon-bons in the following recipe. Almost like I planned them to go together.

Dark Chocolate Oatmeal Cookies

Ingredients
2 cups sugar
1 stick butter (1/2 cup)
1/2 cup evaporated milk
1 tsp vanilla
2 1/2 Tbs cocoa
1/2 cup peanut butter (optional but recommended)
3 cups rolled oats (or sub rice krispies cereal)
1 cup powdered sugar (optional)


Directions
  1. Combine all ingredients except peanut butter and oats in an medium-size pot and cook over medium heat. Bring to a boil.
  2. Let boil for about 5 minutes, stirring constantly.
  3. Remove from heat and stir in peanut butter and oats.
  4. Spoon out quickly onto wax paper or aluminum foil.
  5. (optional) Refrigerate for 20 minutes to an hour, then roll into balls and coat with powdered sugar.
  6. Cookies will harden as they set.


Coconut Bon-Bons

Ingredients
1 (15 ounce) can sweetened condensed milk
1/2 cup butter margarine
2 1/2 cups sugar (powdered works best, but either will do.)
1 (12 ounce) package shredded coconut
1 cup cocoa powder
1/2 cup whole milk/cream/condensed milk
1 cup crumbled or ground peanuts

Directions
  1. Mix together condensed milk, butter, 2 cups sugar, and coconut. Cover with wax paper and chill for 24 hours.
  2. In medium-sized saucepan, combine cocoa powder, milk, and remaining 1/2 cup sugar. Bring to a boil, stirring constantly. Remove from heat and let cool 20 minutes.


  3. Roll coconut mixture into 3/4-inch balls and dip into chocolate.
  4. (optional) Roll in nuts.
  5. Place on wax paper to cool and dry.


Serving suggestion: Ever had frozen bon-bons? These are better; I guarantee it. Freeze them. You'll thank me. There's a reason there's only 1 left.


No-Bake Cookie Twofer: Oatmeal Dark Chocolate Cookies and Coconut Bon-BonsSocialTwist Tell-a-Friend

Monday, December 21, 2009

Give Homemade, Wrap Homemade: How to create your own festive and frugal wrapping paper, gift bags, and gift boxes.


Since we've dedicated the last several posts to homemade and frugal gifts, it's only fitting that we now share homemade and frugal ways to wrap those gifts. There's no use worrying about saving money on gifts and then spending the money you saved just to wrap them, right? So here are some ideas for cheap, cute, thoughtful giftwrap.

Make your own wrapping paper
Turn paper grocery bags into functional works of art. Use them plain and dress them with pretty ribbon or colored twine or get creative and decorate the paper with paint, crayons, or colored pencils.

If you're making paper for more than one gift, chances are you'll want to mass-produce to save time. This is where the stamps come in. Use rubber stamps and ink, X-mas cookie cutters with paint or make your designs by carving some potato stamps. If you've got kids, give them some finger paint or crayons and let them go to town. This is a great opportunity to involve them in the giving process.

If you don't have paper grocery bags lying around, art and school supply stores offer economically priced brown or white butcher paper on large rolls. No paint around? Dying with coffee or tea can give some surprisingly classy-looking results. I especially like the vintage-y combo of coffee or tea-dyed newspaper.


Alternate Wrappings
Don't have the time to make your own wrapping paper? Or perhaps you're not feeling very artistic? No problem. Try wrapping gifts with other spare items such as:
  • scrap fabric

    Traditional Japanese wrapping cloth,furoshiki,...Image via Wikipedia

  • maps (if you don't have a bunch of old ones lying around like I do, you can pick them up from your local tourist information office for free)
  • old newspapers or comics
  • children's artwork
  • magazine pages—choose festive spreads or be clever and pick pages that hint at the recipient's interests or even the gift itself


Boxes, Bags, and More

Need something to protect your gift before you wrap it? Try one of these before you pay for a gift bag. (If you must buy gift bags, hit up the dollar store first; they usually offer them for 1/4 what regular stores charge.)
  • shoeboxes
  • coffee cans
  • oatmeal canisters
  • baskets
  • glass jars
  • check out this tutorial about how to turn a cereal box inside out for a frugal, eco-friendly gift box


Tags
Hole punch, add ribbon, et voila!
  • scrap cardboard from food boxes
  • scraps leftover from grocery bags or wrapping paper
  • cards from old board games
  • playing cards
  • last year's Christmas cards


Bows/Gift-toppers
  • old hair ribbons, bandannas, or scarves
  • scrap fabric or ribbon
  • Christmas ornament (homemade or otherwise)
  • for children: spare GI Joes, Polly Pockets, or other small toys
  • a sprig of holly or spruce
  • tissue paper (or plastic grocery bag) pom-poms
  • candy canes or other festive-colored candies
  • a few loops of cranberry garland
  • small glittered pine cones
  • paper grocery bag handles (these can be quite easily glued into cute bows)


Give Homemade, Wrap Homemade: How to create your own festive and frugal wrapping paper, gift bags, and gift boxes.SocialTwist Tell-a-Friend

Wednesday, December 16, 2009

Giveaway: Peapod $10 credit


A grocery store in David, PanamaImage via Wikipedia

In honor of nothing in particular, TAiMH is giving away a $10 credit, good on your next order from Peapod.com, the online grocery delivery service. There's no minimum purchase amount to use this credit, so if you just want to get $10 of free groceries, that's fine by me. Use it however you like. If you don't already have a Peapod account, it's quick and easy to open one. Peapod's service is not available everywhere; check their website for details.

To enter the giveaway, just leave your e-mail in a comment below, so we can contact you with the credit code when you win. ;)

Giveaway ends 12/30.


Disclaimer: Peapod.com does not sponsor this blog in any way. I'm pretty sure they have no idea we even exist.


Reblog this post [with Zemanta]


Giveaway: Peapod $10 creditSocialTwist Tell-a-Friend

Monday, December 14, 2009

Quick Hack: Easy Recycled Materials Christmas Candle Holder


Make a pretty, festive, tapered candle holder for absolutely free with items you have sitting around the house.


Materials
4 toothpicks
glue
1 candle
2 rubberbands
pocket knife or craft knife
wide ribbon or scrap of fabric
any plastic container with a spout that roughly fits your candle (I used a small bleach bottle.)


Directions
  1. Cut your container about 2 inches from the top.

  2. Cut it again about 3 inches from the bottom.

  3. Discard the middle piece.

  4. Invert the top piece and insert it into the bottom piece. Glue to secure them together. This is your holder.

  5. With your knife, cut small notches into the middle of your toothpicks. This isn't essential, but it helps the glue hold them together better. Two of the toothpicks will need one notch on each side; two of them (the top and bottom toothpicks) will only need one notch each.

  6. Stack your toothpicks in a star formation and glue, preferably with either superglue or a hot glue gun.


  7. While the star is drying, wrap your ribbon or scrap fabric around the holder and glue in place. Use the rubber bands to hold the ribbon or fabric in place while the glue dries.

  8. If desired, paint or otherwise decorate the star. Gold glitter looks especially nice in candlelight, I think.

  9. Once both the holder and the star are dry, glue the star onto the ribbon/fabric. Balance between the candle and the toothpick container until it dries, et voila!


Quick Hack: Easy Recycled Materials Christmas Candle HolderSocialTwist Tell-a-Friend

33 Easy and Frugal Homemade Holiday Gift and Decoration Ideas


a red blown glass Christmas tree ornament, a t...Image via Wikipedia

With the unemployment rate at a record high and the economy doing so poorly, many of us have resigned ourselves to giving and receiving less this holiday season. But that doesn't have to be the case. Homemade gifts are more thoughtful and personal, as well as more frugal. There's no reason being on a budget has to mean toning down the fun and festivity of the giving season.

Making homemade gifts for kids can be more challenging. They've likely had a list of expensive toys or video games ready for the past month. If this is the case, choose one or two of the less expensive items on their list and combine it with one or more homemade gifts from the "Especially For Kids" section below. This way they get just as many presents as they're used to, but you spend less money. Plus, it's a great way to introduce children to being creatively frugal and ushering them away from consumer comercialism.

The key to creating fantastic, frugal, homemade gifts is to know your strengths. What do you do well? Cook? Bake? Sew? Build? Knit or crochet? Draw? The following are a set of lists of inexpensive, easy-to-make homemade gifts your friends and family are sure to adore, organized by talent. I haven't seen this type of organization before; I hope it's helpful.

Cooking
  1. Homemade preserves, jams, and spreads. Make a variety, put them in cute jars with printed or handwritten labels, and arrange the jars in a basket. You can often find small inexpensive baskets at garage sales, craft stores, or home and garden stores.


  2. Homemade sauces, condiments, and marinades. Package as in #1.

  3. Homemade cookbook or recipe cards. Know someone that loves your cooking? Compile recipes of their favorite dishes (or ones you think they might like). Print them on paper and arrange in a decorated binder or write them by hand on homemade recipe cards. If you're not strong in the art department, you can usually find cute sets of inexpensive blank recipe cards at Marshall's. If you can find or decorate a cute box for the cards, even better.

Baking
  1. Loaf of special homemade bread. Make it a regular white loaf, or if your loved one is more health conscious, try a whole wheat or mixed whole grain loaf. Tip: Spice it up: make a flavored and herbs like rosemary, dill, tomato-basil, or sourdough or make it look fancy by braiding it.

    If fresh bread won't work for travel or other reasons, try making bread mixes instead. Put each in a small paper bag and label nicely. Include handwritten recipe cards with instructions. Collect bags in a basket or larger gift bag.

  2. Two words: gingerbread men (and/or women, snowmen, wreaths, etc.) These are super fun to make and decorate and they're a great project to do with kids. Make them to eat or to use as ornaments.


  3. Assorted homemade cookies. This is good if you have multiple people to "buy" for. Make one or more batches (depending on how many people your giving to) of several types of cookies and package in small baggies tied with festive ribbon. In a nice basket or other container, one for each gift recipient, put one baggie of each type of cookie. If you're in a pinch, even personalized brown lunch bags can be prettied up. As in #1, if the gifts have to travel a ways or for other reasons keep for a long time, consider making mixes instead.

  4. Homemade pancake, waffle, muffin, or biscuit mix. Package as above. A small wooden scoop is a nice touch. You can find these at craft stores. Package the mix in small brown bags or mason jars tied with a ribbon and hand-labeled.

  5. My all-time favorite baked gift: cherry pie. Do not underestimate the giving power of a homemade pie. Cake, flan, or other delicious desserts are also welcome. (Hint, hint.)

Sewing/Knitting/Crocheting
  1. Handmade tool belt, tote, makeup bag, purse, pencil organizer, or messenger bag.


  2. Ready-to-hang embroidered or needlepoint work in frame.

  3. Embroidered/personalized handkerchiefs, scarf, pillows, or sachets.

  4. (Relatively) quick knitted/crocheted items such as scarves, gloves/mittens/glittens, cozy winter hats, socks, woven belts, etc.

Building/Crafting
  1. Picture in handmade frame: Make your own from wood, or if you're less skilled with carpentry, try making simple ones from rigid cardstock and decorating them with felt, marker, paint, fabric, and/or glitter.

  2. Handmade Christmas ornaments. Ideas: dyed popcorn and/or cranberry strands, oranges with cloves, gingerbread ornaments, sparkly pine cones, photo ornaments, paper snowflakes, felt cutouts, etc.

  3. Try this fabulously simple salt-dough recipe to make paintable ornaments: Combine 1 cup flour, 1/2 cup salt, and 1/2 cup water. Roll out dough and cut either by hand or with cookie cutters. Bake at 250F for 2 hours.


  4. Colored, scented, and/or decorated candles. Go a step further and make candle holders, too!

  5. Bowls, planters, vases, or ashtrays made from old vinyl records—bad ones can usually be found for around 50 cents each at thrift stores.

Drawing/Painting/Design
  1. Coffee mug with treats: Find some plain mugs at a thrift store or garage sale, get some ceramic paint, and create a personalized, useful coffee mug. Stuff it with a baggie of whole coffee beans or candies, and tie with a ribbon.


  2. Decorated plant pot with seeds or small plant and care instruction card.

  3. Thoughtfully designed, personalized stationery, note cards, postcards, or phone/address book. Make them on the computer or by hand the old fashioned way with rubber stamps, colorful paper, and glue. Warning: rubber stamps and decorative papers don't come cheap. Attempt this only if you already have these items.

No talent required
  1. A pound of pistachios, nice teas, or coffees, packaged nicely by hand.

  2. Homemade cocoa mix: recipes here. Package in a decorated mason jar or paper lunch bag.

  3. Gourmet, homemade teas: Recipes here. If you can find a cute inexpensive teacup or pot, arrange your homemade teas inside it and add a pretty ribbon.

  4. Homemade organic body scrubs, lotions, oils, bath salts, or bath bombs. Recipes here.

Especially For Kids
  1. Homemade play dough: make a variety of colors and place in assorted tubs or other plastic containers. Label and package in a dressed up box or basket, preferably one that they can use permanently to store their new play dough.

  2. Handmade stuffed animals.

  3. Lacing cards made from old greeting cards or magazine pictures glued (glue stick works best) to cardstock.

  4. Homemade crayons. Collect broken or super short crayons, melt them down, and create beautiful swirled crayons in fun shapes.


  5. See "cookies" under "Baking" above. Duh.

  6. Painting Set. Combine some paint brushes, assorted paints (corresponding to the child's age and ability), paper, and perhaps a palette. For the palette, try an old cutting board or plastic lid with a child size thumb hole cut out. Or if that's out of your crafting league, check your local art supply store, dollar store, or toy store for inexpensive ones.

  7. Drawing Set. Combine assorted weight pencils, charcoal, and erasers with an inexpensive drawing pad and perhaps a tracing pad. Depending on the child's age and ability, you could throw in some drawing books as well. You can often find these in the "bargain" section at bookstores.

  8. Gardening Kit. Combine and package a few different types of seeds and/or bulbs, toy gardening tools (sand castle kits from the dollar store work well and are cheap), a labeling kit (popsicle sticks and cardstock rectangles), and perhaps a toy watering can.

  9. Costume Chest. In a large box, decorated perhaps with the child's name, combine various articles or clothing that would be fun for playing dress-up. Raid your closet for items that either don't fit or are out of style and make a trip to Goodwill to make up the rest. The more outrageous the better.


33 Easy and Frugal Homemade Holiday Gift and Decoration IdeasSocialTwist Tell-a-Friend

Wednesday, December 9, 2009

Quick Hack and Holiday Gift: Homemade body scrubs, lotions, oils, bath salts, or bath bombs


tower o' bombsImage by Amanda *Bake It Pretty* via Flickr

Everybody loves a nice relaxing bath, and I don't know a female on the planet who doesn't love receiving bath-related gifts. Last year, I made a batch of each of these and made bath gift baskets for all my friends and relatives, even the guys. (They got manly scented salts and bombs only, and they loved them. MDT especially is sucker for a hot bubble bath. His favorites are the bombs. What a surprise.)

This year I'm too far away from most of my friends and family to make these, so I'm sharing the recipes with you. Have fun!

Already got your holiday gifts covered? Get together some girlfriends and have a DIY pamper party. Everybody brings one ingredient, in bulk, and you get to spend an evening with your pals drinking wine and making pretty stuff. At the end of the night, swap for your favorite fragrance combos and take home a basket of goodies. You'll be set for the next year.


Bath salts

Ingredients
6 cups Epson salts
2 T baby oil
1/2 tsp of the essential oil of your choice
1/8 tsp food coloring - gel works best
assorted jars or containers

Directions
Mix liquid ingredients first. Add in salts and stir. Package in 1 cup jars.

To use
Add 1/4 cup salts to warm running bath water.


Salt (or sugar) scrub

Ingredients
6 cup sea salt or sugar (large grain, unrefined works best)
3 cup oil (almond, olive, baby, etc.)
30 vitamin E capsules
a few drops of the essential oil of your choice
Dried flower petals, dried herbs, the zest of lemons or other citrus fruits (optional)

Directions
Dissolve vitamin capsules in oil over low heat. Mix all ingredients, and package in small jars.


Powdered milk bath

This is one of my favorites. I love stepping out of the bath with baby soft skin and smelling pretty. It's a simple pleasure.

Ingredients
3 cup powdered milk
1/2 tsp essential oils

Directions
Combine and mix well. Package in small jars.

Additions/Substitutions:
You can substitute vanilla extract for the essential oils.


Vanilla and honey bath oil

Ingredients
1 cup baby oil
1/2 cup honey
1 T pure vanilla extract
1/2 cup liquid soap (optional, for foam)
small bottles (I save all my condiments bottles—hot sauce, soy sauce, etc.—and recycle them for this.)

Directions
Combine and mix well. Package in small jars.


Bath bombs

These are super fun. I love love love using them. So much, in fact, I always make several extra for myself.

Ingredients
2 T citric acid
2 T cornstarch
1/4 cup baking soda
1/4 tsp essential oil
5 drops food coloring
Dried flower petals, dried herbs, the zest of lemons or other citrus fruits (optional)
3 T oil—olive, coconut, almond, etc.
Wax paper, molds, or cupcake tin


Directions
  1. Mix dry ingredients.
  2. Mix oil fragrance and coloring in another bowl.
  3. Incorporate wet mix into dry mix.
  4. Roll into balls, place on wax paper. Or, if using cupcake tin or molds, scoop mix in and pack well.
  5. Wait 2 days.
  6. Store in sealed containers or wrap in colorful plastic wrap


Reblog this post [with Zemanta]


Quick Hack and Holiday Gift: Homemade body scrubs, lotions, oils, bath salts, or bath bombsSocialTwist Tell-a-Friend

Monday, December 7, 2009

Quick Hack and Holiday Gift: Homemade Gourmet Tea Blends


Christmas spice teaImage by hiromy via

Besides tasting lovely, tea is said to have many health benefits including increased energy, reduced blood pressure, immune system strengthening, enhanced concentration, and even healthier, younger-looking skin.

But contrary to popular belief, you don't have to spend a small fortune for gourmet tea. If you make your own, it's ridiculously cheap, especially if you grow your own herbs. But not to worry if you don't have an herb garden—all the ingredients for the following recipes are easy to find and can be acquired on the cheap at your local grocery or farmers' market. Moreover, when you make your own tea blends from loose tea, not only is the quality of the tea much higher, but it's more economical as well. In general, loose tea costs less than tea bags and you can resteep loose tea, thereby stretching your tea dollar, so to speak.

Make these frugal, gourmet teas for yourself or package them in neat jars or tins and give them as gifts to your favorite foodies/tea-lovers. Include an inexpensive tea strainer or infuser, maybe a small jar of honey or some homemade tea biscuits or scones and you've got the perfect gift for your favorite foodies/tea-lovers/anglophiles.

Don't forget to check the brewing tips at the end of the post!

On to the recipes.


This first isn't exactly a tea but rather a spice mixture. Add a bit to your favorite black tea along with a splash of warm milk, and you've got Chai (literally just means "tea," but is used worldwide to refer to Indian-style spiced tea with milk). This mix is a personal favorite and a result of lots of trial and (tasty) error. Perhaps the name is a bit biased, but so be it.

Perfect Chai (Indian Spiced Tea) Mix
Yields 3 cups of mix. (Each cup of mix makes 24 cups of chai.)

Ingredients
2 cups powdered sugar
1 vanilla bean
4 tbsp ground ginger
2 tbsp ground cinnamon
4 tsp ground cloves
4 tbsp ground cardamom
4 tsp ground nutmeg
4 tsp ground allspice


Directions

1. Cover the vanilla bean with the sugar and store overnight in an airtight container. The sugar will absorb the vanilla flavor. In the morning, remove the bean and throw it out.

2. Combine all the ingredients and mix well. If some of the spices are not ground to a fine powder already, pulsing them all together in a food processor should do the trick.

Preparation
Add 2 tsp of mix to a half-filled cup of hot black tea, fill with warm milk, and stir.
It's also quite good cold; just sub iced tea and cold milk.


Gourmet Herbal Teas

Combine any flavors you like and mix with loose tea—red, green, or white all work well. For an even more thoughtful and personalized gift, choose herbs with target benefits to create a custom blend for your loved ones. (The links above are to the most economic bulk loose teas available on Amazon at the time of this writing.)

Supplies
your choice of herbs
mortar and pestle (depending on your selection of herbs)
small jars or plastic baggies
ribbon
basket or other gift container


Suggested Blends
(All herbs should be dried and either whole or crushed, not ground.)

1 part ginger root, 1 part cloves, and 1 part nutmeg
1 part chamomile flowers to 1 part peppermint leaves
1 part dried ginger root to 2 parts peppermint leaves
4 parts anise, 
1 part cinnamon
 bark, 1 part cloves, and 1 part vanilla bean

3 parts rosemary, 
3 parts lavender flowers
, and 3 parts marjoram

1 part cloves, 1 part allspice, and 1 part cinnamon bark
2 parts lemon verbena leaves to 1 part lavender flowers


Directions
Mix herbs thoroughly, toss the mixture with the loose tea of your choice, and store in an air-tight container.

Preparation
Brew 1 tsp of tea in 1 cup of not-quite-boiling water.


Tea Brewing Tips
1. Most teas take between 30 seconds and 2 minutes to brew. Any more and you risk oversteeping, which makes the tea bitter.

2. Like coffee, tea doesn't take well to boiling water. I do recommend boiling the water to purify it, but just make sure you let it cool a few minutes before adding it to your teapot.

3. You can reuse or resteep loose tea leaves up to 4 times. Just let each brew steep a minute longer than the one before. Don't try this with tea bags; it won't work. That's a difference between loose tea and tea powder. Just another reason why making your own loose tea blends is more economical than buying boxed flavored tea or tea bags.


Want to get ahead on next year's gifts or just want to keep yourself in organic cooking and tea ingredients? Winter's a perfect time to start a little indoor herb garden.

Reblog this post [with Zemanta]


Quick Hack and Holiday Gift: Homemade Gourmet Tea BlendsSocialTwist Tell-a-Friend

Got Design?

TAiMH blog design by Belle Étoile Studios.